In this tutorial, we'll go over how to properly set-up Foil Effects card or sticker artwork for printing at Clubcard. We'll be using business card artwork, however the process is the same for any size card or sticker that features the Foil Effect finish. We'll also be using Adobe Illustrator for the purpose of this tutorial, but the process should be similar for any program which allows for vector output.
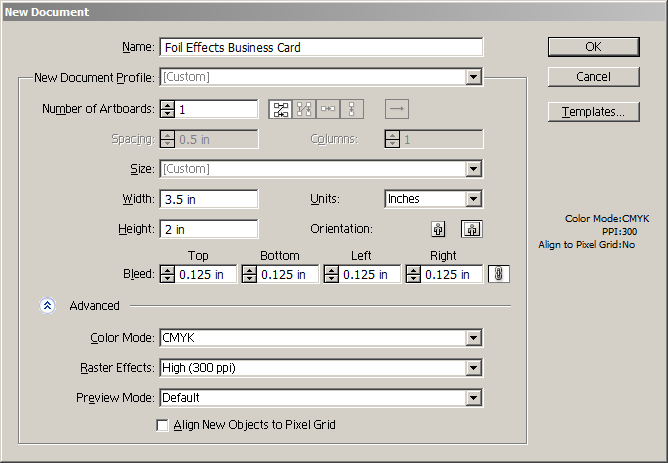
Start by creating a document that is 3.5" x 2" in size with 1/8" of bleed on each edge.

We'll start in the Layers window by renaming the default "Layer 1" to "CMYK Front" - this indicates we will be placing our full color CMYK business card artwork on this layer. If you don't see the Layers window, you can enable it from Window -> Layers or by pressing F7.

Place your print ready CMYK artwork for the front of the card into the document. Ensure your artwork contains a bleed by making sure it extends to the red bleed margin we set up at the beginning.

Foil Effects printing works by putting down a layer of shiny silver foil and subsequently printing over top of it using full color CMYK ink. The result is that you can have a wide range of foil colors on a single card and are not limited to just one or two as with standard foil stamping.
To provide Clubcard with files for Foil Effects, one must clearly indicate where the Foil Effect finish is to be placed on the card. In the case of Michael's card here, we want his silhouette to be shiny while all other parts on the front are the standard matte finish.
First things first, we will create a new layer above the original and call it "Foil Front".

We'll bring in our foil artwork for the front and ensure it lines up correctly with the CMYK artwork beneath.

As you can see, the foil layer is a solid black shape which covers up Michael's silhouette completely - this is what we want. When the business cards are printed, this solid black area will be printed as a shiny silver foil, and then the full color artwork from the "CMYK Front" layer will be printed on top. What we will be left with is a shiny silhouette of Michael and all other areas will be a standard matte - it should look great!
One important thing to note is that the black area should be set to only 100% K in CMYK - there should be no Cyan, Magenta or Yellow ink indicated on this layer. You can double check that by selecting the black shape and looking at the Color Window. You should see the slider for "K" all the way up to 100% and C, M and Y sliders set to 0.

We'll repeat the previous steps again for the back of the card as well. On the card back we will be indicating a foil effect on the Clubcard logo in the top left corner.


Now that our artwork setup is complete, we're ready to save files for print. We'll be saving four separate files: The Front CMYK, Back CMYK, Front Foil and Back Foil. Luckily we created separate layers for each one so it should be easy!
We'll save the CMYK Front file first. In the Layers window, click the little eyeball icon next to the CMYK Back, Foil Back and Foil Front layers to turn them invisible. Now when we save the print file, it will just be the CMYK Front as it's currently the only visible layer.

Go up to File -> Save As… and name the document something obvious. In this case we'll call it "CMYK_Front.pdf" - Make sure as well that the "Save as type:" drop-down has "Adobe PDF (*.PDF)" selected.

You'll encounter the "Save Adobe PDF" window next. This menu may look intimidating, but there's an easy way to ensure the file you save is good for us to use. In the very top drop-down menu titled "Adobe PDF Preset:" you can select "PDF /X-1a:2001"

This preset is designed to export files which are suitable for the type of printing Clubcard offers and is generally a good choice. If anything weird happens don't worry! We'll catch it in the file check and let you know.
The only settings we'll want to change are the ones under the "Marks and Bleeds" section. By default everything is turned off but we'll need to make a few adjustments here. Check the "Trim Marks" box under "All Printer's Marks" - we don't need any of the fancier ones so you can leave the rest un-checked. In the "Offset" box enter the value "0.125 in" so that the crop marks stay outside your bleed area. Finally, under the Bleed section, check the "Use Document Bleed Settings" box so that the PDF is saved including that 0.125" bleed on all sides that we set up back at the start.

Click on "Save PDF" in the bottom right and you're done! …With the first file at least. Opening the PDF in Acrobat, you will see that it now has crop marks and bleed and looks super official.

You can now repeat that for all the remaining layers, ensuring that just the eyeball for that layer is active in the Layers Window when you do so. The PDF options should save from the first time so you don't need to redo the settings again.
Once you've got all four files saved you're ready to send them to Clubcard for printing!
Here is the final result!

As always feel free to contact us with any questions or concerns and we'd be happy to help you out.
